Shared Vault Tutorial
Creating a shared vault.
Creating a shared vault is as simple as clicking the icon in navigation menu located at the top of the shared vault page. Then selecting Add Shared Vault.
Once selected, the add shared vault menu will appear. Fill in all required fields and click Save to add your shared vault.
Modifying a shared vault.
Editing a shared vault can be initiated by clicking the three ellipses next to a shared vault. Then selecting Edit Details
Once selected, the edit shared vault menu will appear. Make your modifications to the relevant fields and click Save to update your shared vault.
Deleting a shared vault.
Deleting a shared vault can be initiated by clicking the three ellipses next to a shared vault. Then selecting Delete Shared Vault.
Once selected, confirm your deletion by clicking Confirm.
Please note deleting a shared vault will result in all folders and objects to be deleted, and member assignments being revoked.
Permissions.
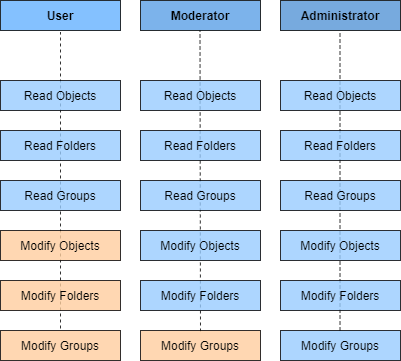
You can control actions users can perform on shared objects by assigning them one of three permission types within the shared vault menu. You can see what actions each permission type provides by observing the table below.

Additional Information.
Shared vaults can appear as two different colours within your shared vault menu.
If a shared vault is shown with a blue shade, this indicates that the shared vault has been shared with you. If a shared vault is shown with a standard white background, this indicates that the shared vault is owned by you.